Hands-on MCP from Scratch: Chrome DevTools, Gemini, and VSCode Integration Guide
Quick start guide for common MCP Server installation examples (including Chrome DevTools), configuration instructions for various IDEs/CLIs, and a summary of common MCP extensions in the Gemini Extension Marketplace
MCP (Model Context Protocol) is an open, lightweight protocol that standardizes how AI applications (especially coding agents) access and manipulate external data sources and tools.
Purpose: Exposes any data source or tool to LLMs/agents via a unified interface, supporting reading, operations, and automated workflows.
Quick Start: Most MCP Servers can be used directly by MCP clients with the following JSON configuration:
MCP (Model Context Protocol) defines a lightweight set of RPC/tool calling specifications, enabling large language models or agents to access various data sources and external tools in a unified manner. In other words, MCP encapsulates different data sources and services into "agent-callable tools," allowing agents to:
Discover available capabilities (tools / endpoints)
Request context or data (read)
Execute actions or operations (write / command)
MCP's design goals are extensibility, security, and ease of integration: any service can implement an MCP Server, allowing multiple clients (IDE, CLI, desktop applications) to reuse the same access method.
Core Concepts at a Glance
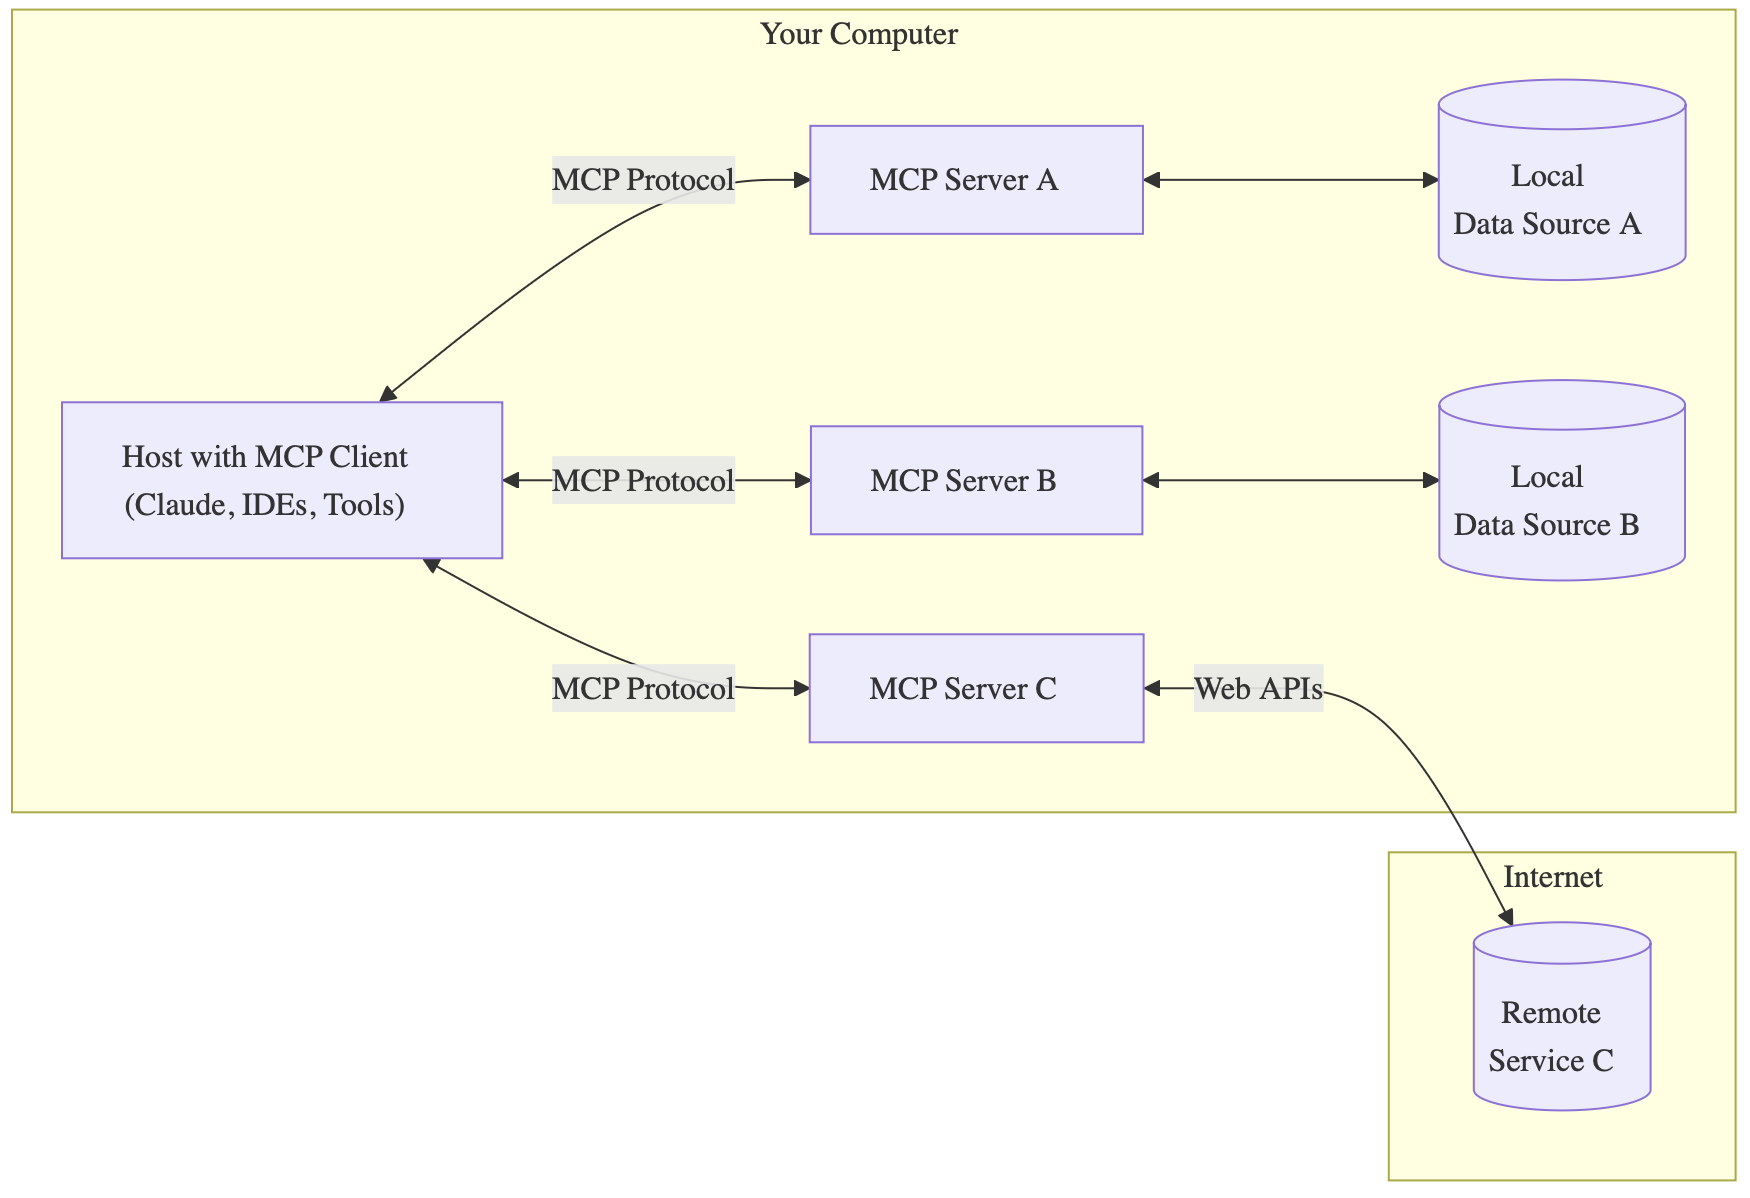
MCP Host: The main program running on the user's side, such as an IDE, conversational agent, or desktop application, which initiates calls to MCP Servers.
MCP Client: The protocol endpoint implemented within the host, used to manage connections with MCP Servers (1:1).
MCP Server: Each server exposes specific capabilities via a unified protocol (e.g., accessing Chrome DevTools, querying databases, reading/writing Vault).
Contents
Created
Updated
Word count
2025
Reading time
10 minutes
Local Data Source / Remote Service: An MCP Server can bridge local files, databases, or cloud services, providing context to models or executing tasks.
Key Advantages of MCP
Unified Interface: Avoids redundant adapter implementations for each data source.
Bidirectional Capabilities: Supports not only data retrieval but also executing changes or triggering actions.
Ecosystem Extensibility: The community can contribute Servers, enabling models to access more systems (databases, monitoring, CI/CD, storage, etc.).
Enhanced Agent Capabilities: Models can make more reliable and actionable suggestions or changes based on real-time temporal data.
Quick Path to Reading This Article
Just want to try it out quickly? Jump to "Installation Example — Chrome DevTools MCP".
Want to integrate MCP into an IDE (VS Code / JetBrains / Copilot)? See "MCP Client Configuration (IDE / CLI Installation Methods)".
Want to learn about available extensions? See "Gemini Extension Marketplace — MCP Extension Summary".
Terminology and Compatibility Notes
Most MCP Servers are published using Node (npm), but there are also Python, Go, Docker, and other implementations; please refer to the corresponding repository's README for installation steps.
When running in a restricted environment (such as macOS application sandbox or certain containers), an MCP Server might not be able to automatically launch dependent local binaries (e.g., Chrome). In such cases, use --connect-url/--executablePath or manually launch the target service on the host.
Installation Example — Chrome DevTools MCP
The following example demonstrates how to install and configure chrome-devtools-mcp in your MCP client. It assumes you have met the requirements listed in the repository's README:
Node.js v20.19+ and npm
Chrome browser installed (or an available Chromium executable)
Configure via MCP Client (Recommended)
Add the following configuration to your MCP client's configuration (most clients support a JSON-style mcpServers configuration):
Note: Using chrome-devtools-mcp@latest ensures the client pulls the latest MCP server version each time it starts; if a fixed version is needed, replace @latest with the specific version number.
Run Directly Locally via npx (Quick Test)
Run in your terminal (fish):
bash
npx -y chrome-devtools-mcp@latest
This will start the MCP server (the server itself will launch a Chrome instance when needed). To view available CLI configuration options, run:
bash
npx chrome-devtools-mcp@latest --help
Common configuration examples (passed via client args):
--channel=canary Use Canary version of Chrome
--headless=true Headless mode (no GUI)
--isolated=true Create a temporary user data directory for each run
--executablePath=/path/to/chrome Specify a custom Chrome executable
Below are methods for adding chrome-devtools-mcp as an MCP Server for common IDEs and CLIs. Most clients use the same configuration snippet as in this article:
In each client, you can paste the above configuration into its MCP configuration interface or use the imperative installation methods listed below.
Claude Code
Add using Claude Code CLI:
bash
claude mcp add chrome-devtools npx chrome-devtools-mcp@latest
(Refer to Claude Code's MCP documentation for managing project/user-scoped installations)
Cline
Configure MCP servers according to Cline's official documentation (refer to https://docs.cline.bot/mcp/configuring-mcp-servers). Paste the above JSON into the UI or use Cline's provided CLI configuration process.
Windows (Codex) Note: On Windows, you might need to configure command as cmd and pass cmd /c npx -y chrome-devtools-mcp@latest via args, and increase startup_timeout_ms. Refer to the .codex/config.toml example in Codex documentation.
Copilot CLI
Add interactively via Copilot CLI:
Launch Copilot CLI:
bash
copilot
Run the command in the chat:
/mcp add
Fill in the prompts: Server name = chrome-devtools, Server Type = Local, Command = npx, Arguments = -y, chrome-devtools-mcp@latest, save configuration.
Copilot / VS Code
(VS Code section provides more detailed steps below)
Cursor
Cursor supports one-click installation (Deep Link) or manual addition:
One-click: Click on the MCP installation button in Cursor (deeplink provided in README).
Manual: Settings -> MCP -> New MCP Server, paste the above JSON configuration.
gemini mcp add -s user chrome-devtools npx chrome-devtools-mcp@latest
Gemini Code Assist: Paste the above JSON into its MCP configuration interface or add according to Code Assist's configuration guide.
JetBrains AI Assistant & Junie
In JetBrains IDE:
Open Settings | Tools | AI Assistant | Model Context Protocol (MCP) -> Add
Fill in name=chrome-devtools, command=npx, args as -y chrome-devtools-mcp@latest.
For Junie (another JetBrains plugin), go to Settings | Tools | Junie | MCP Settings -> Add, configure the same way.
Visual Studio
Visual Studio supports installation via graphical interface (Install button provided in README). You can also use the VS platform's deeplink for installation, or manually add the above JSON in VS's MCP configuration.
Warp
In Warp: Settings | AI | Manage MCP Servers -> + Add, paste the above JSON or use Warp's MCP management interface to complete the configuration.
Using in VS Code (Copilot / VS Code MCP Support)
There are two common ways to add chrome-devtools-mcp to VS Code (or Copilot CLI):
Manually add in VS Code's MCP configuration interface
Open VS Code's MCP settings (refer to Copilot / VS Code's MCP documentation).
Add a new MCP Server, set name=chrome-devtools, command=npx, args to chrome-devtools-mcp@latest (can add -y).
Automatically add using VS Code CLI (run in local terminal, fish shell):
If VS Code is running in a sandbox or restricted environment, you might need to adjust --executablePath or use --connect-url to connect to a manually launched Chrome instance.
To enable more detailed logs, set the environment variable DEBUG=* in the environment where VS Code is launched, or point --logFile to a file in the configuration to collect logs.
Using in Gemini
Gemini CLI provides convenient commands to add MCP servers:
gemini mcp add -s user chrome-devtools npx chrome-devtools-mcp@latest
Alternatively, open Gemini's MCP configuration interface and manually copy the mcpServers JSON configuration to add as a new MCP Server.
Common Issues and Debugging Tips
Permissions and Sandboxing: On macOS, if your MCP client places the server in a restricted sandbox, chrome-devtools-mcp might not be able to launch Chrome (requiring creation of a sub-sandbox). Solution: disable sandboxing in the client or use --connect-url to connect to manually launched Chrome. Refer to the repository's "Known limitations".
User Data Directory: The default user data directory is $HOME/.cache/chrome-devtools-mcp/chrome-profile-$CHANNEL. If you don't want to reuse the same configuration, use --isolated=true.
Chrome Executable Path: For non-standard installations (or using custom Chromium), use --executablePath=/absolute/path/to/chrome.
Logs and Errors: Set the environment variable DEBUG=* or --logFile=/path/to/log to collect detailed logs for easier issue submission.
MCP Extension Summary
For MCP Servers, they can generally be added to the MCP configuration via an MCP client or the Gemini CLI (examples below).
And many other MCP extensions for databases, monitoring, cloud services, and development tools (e.g., cloud-sql-postgresql-observability, cloud-sql-mysql-observability, observability, mcp-confluent, etc.).